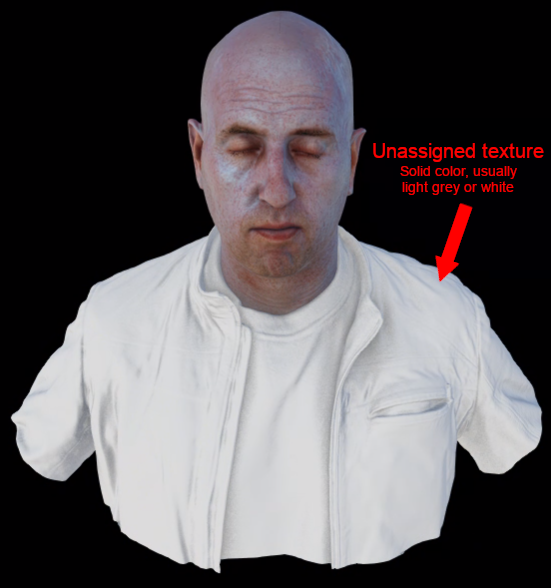
If any portion of your asset unexpectedly has a solid color (usually white / light grey) on it as shown below, this means one or more required texture files may need to be manually assigned to the material.
Before you fix it manually, it's worth knowing that this issue can happen when not including .mtl (material) file with your obj upload. Material files are needed so that Nira can assign all the material parameters, including textures. Some applications don't preserve the the texture assignments in the mtl file so please follow the steps outlined below to assign the textures manually.
Luckily, it is a simple issue to address.

To identify and fix unassigned textures:
1. Open the asset in Nira
2. Press the Edit mode button near the top of the UI:

3. Right click on the unassigned texture in the 3D view and press "Select Material":

4. The right side panel will be displayed. Click the "Browse" button next to Base Color. The texture list will appear. Click on the correct texture file to assign it. You can repeat this process if you have other texture files or texture types other than base color (Metallic, Opacity, etc) to assign.

Tip: If the texture file you're looking for doesn't appear in the list, Click here to learn how to upload additional files to your existing asset.
6. Be sure to click 'Save' at the top of the window to preserve your change.

Was this article helpful?
Articles in this section
- Why doesn't my asset have colors?
- How do I delete a file from an asset?
- How can I generate a high resolution orthomosaic or screenshot?
- How do I automatically display a message each time a model is loaded?
- How do I show or hide coordinates?
- Can multiple photogrammetry projects be uploaded to a single asset?
- Why did my upload to fail to process?
- Why is my Nira scene empty?
- How do I delete an asset?
- Why is my asset upload listed as Stalled?
Add comment
Please sign in to leave a comment.